Microsoft SharePoint collaboration software is one of the more powerful tools for companies that need enterprise-scale solutions to manage content, administer business processes, and streamline how people find and share information across the network. The SharePoint system is composed of a full range of applications and tools that allow document management, workflow design, and collaboration. SharePoint helps teams stay connected and productive by providing easy access to the people, documents and information that can help in decision making and getting work done.
With the use of Automate's SharePoint automation activities, organizations have the power to automate the creation, management, and implementation of SharePoint sites that are discoverable throughout the organization and automatically download files from SharePoint. By further streamlining and automating SharePoint processes, a company's resources can be allocated to other areas, instead of having people manually download multiple files from SharePoint, which can lead to reduced costs and greater operational efficiency.
How to Automatically Download Files from SharePoint
In this article, we will explore how you can use Automate Desktop to download a file from Sharepoint stored in a “Shared Documents” library.
Before You Get Started
Download the free trial of Automate Desktop, the automation software that will facilitate your SharePoint Automation.
Your download will be available immediately to use, so you can follow along with this tutorial.
Step 1
Drag the SharePoint action and select “Create Session” activity. You will need to provide the SharePoint site URL and the proper credentials to connect to the SharePoint server. Optionally, the HTTP proxy settings can also be provided.

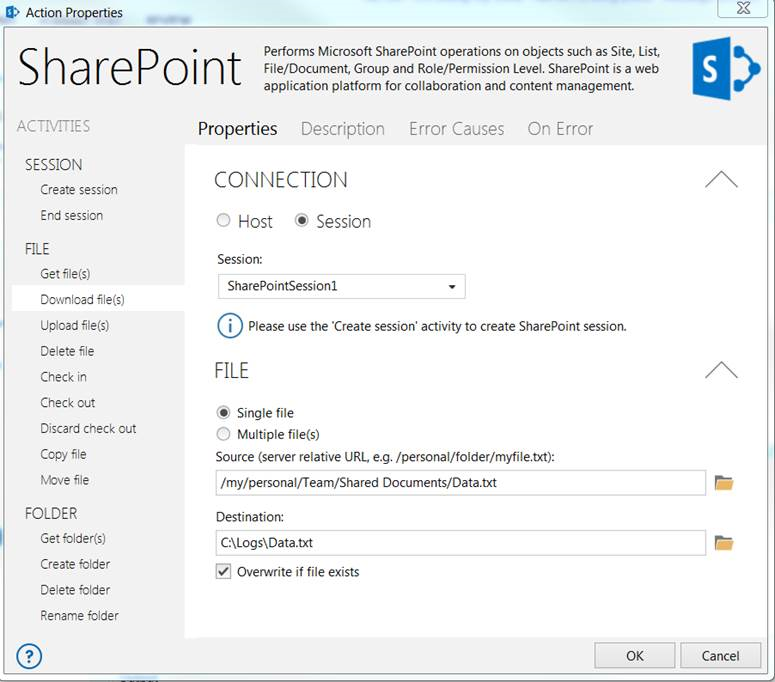
Step 2
Drag the SharePoint action and select the “Download file” activity. In order to download a specific file, you need to provide the server relative URL. In the example below, the URL site is http://server/my/personal/Team, so the server relative URL would be: /my/personal/Team/ Library Name/File Name (/my/personal/Team/Shared Documents/Data.txt). If you have a sub folder inside the library, the URL would look something like this: /my/personal/Team/Library Name/Sub Folder Name/ File Name (/my/personal/Team/Shared Documents/Dev/Log.txt).
Step 3
Drag the SharePoint action and select “End session” activity.
Task:
<AMSHAREPOINT ACTIVITY="create_session" SITE="http://server/my/personal/Team" AUTHTYPE="Basic" USERNAME="administrator" PASSWORD="password" DOMAIN="winserv08r2" />
<AMSHAREPOINT URL="/my/personal/Team/Shared Documents/Data.txt" DESTINATION="C:\Logs\data.txt" PROVIDER="session_based" />
<AMSHAREPOINT ACTIVITY="end_session" />
You can also provide the same server setting in the “Download file” activity and achieve the same result with one step. We recommend that you use session when you need to perform multiple transactions with the SharePoint server.
How to Download All Files from the “Shared Documents” Library
Use the SharePoint activity “Get files” to get the dataset of all the files available in the “Shared Documents” library. Then loop through that dataset and use dataset fields FileRef and FileLeafRef to download one file at a time.
FileRef: provides server relative URL of the file
FileLeafRef: provides the file name
The default query provided in the “Get file” activity will retrieve all the files within the library recursively.
Task:
<AMSHAREPOINT ACTIVITY="create_session" SITE="http://server/my/personal/Team" AUTHTYPE="Basic" USERNAME="administrator" PASSWORD="password" DOMAIN="winserv08r2" />
<AMSHAREPOINT ACTIVITY="get_files" LIBRARY="Shared Documents" RESULTDATASET="test" PROVIDER="session_based" />
<AMLOOP TYPE="DATASET" DATASET="test">
<AMSHAREPOINT URL="%test.FileRef%" DESTINATION="C:\Logs\%test.FileLeafRef%" OVERWRITE="yes" PROVIDER="session_based" />
</AMLOOP>
<AMSHAREPOINT ACTIVITY="end_session" />
Get Started
See for yourself how Automate Desktop can streamline SharePoint tasks and other business processes.