Here's the dilemma: You need to synchronize a set of files from a network share to a SharePoint team site on a daily basis, but these files are not just going into one SharePoint document library. You have to evaluate each of their file names, look up their SharePoint destinations from a SQL database table, and upload each of them to the appropriate SharePoint library. This doesn’t sound too difficult if you are just dealing with a handful of files. But what if it is just not a handful? What if it is hundreds or even thousands of files? It would take hours to evaluate and upload these files manually, not to mention you’d have to repeat the whole process the next day, cutting into essential time from your day to do more important projects.
Basically, you want to automatically upload files to SharePoint online, which you can do through SharePoint automation with Automate!
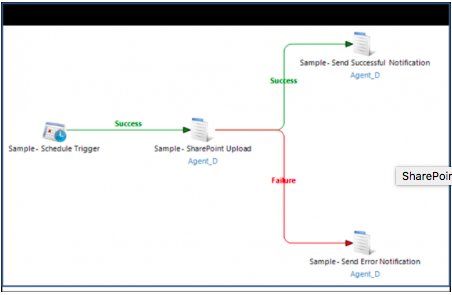
Figure 1: Workflow to Automate File Upload to SharePoint
The Automate workflow (Figure 1, above) has four workflow objects: a schedule trigger and three Automate tasks. Task “Sample – SharePoint Upload” is the main task that accomplishes a major part of the process. The two remaining tasks contain a simple step to send an email to notify if the process executed successfully or not. For the remainder of this blog, we will spend our time on the main task: Sample – SharePoint Upload.
Background
Before we look at the task steps, let’s take a look at the shared folder of the reports, the SQL database table and the SharePoint library structure.
Shared Folder
For this example, let’s assume Figure 2, below, is the shared folder that you need to open every morning to upload all the reports to SharePoint. The prefix of each report (i.e. R0001, RD0002, R0003…etc) is what you need to look up on the SQL database table, Report_Lookup.
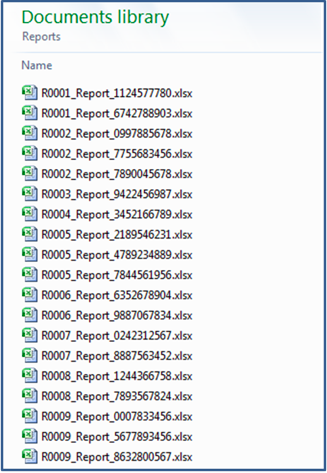
Figure 2: Shared Folder of Reports
With the lookup information from the database table (Figure 3, below), you then have to upload each report to the appropriate SharePoint library.

Figure 3: SQL Database Table
SharePoint Library Structure
Let’s look at how the SharePoint library is set up. In Figure 4, we have a library called “Reports” and it contains numerous subfolders for each department, such as Accounting, Administration, and Development. Within each department folder, there are three separate folders: Daily, Weekly, and Monthly. That means, based on the prefix of the report, we would have to retrieve information from the SQL database table and upload the report to the correct folder within the correct department folder on SharePoint.
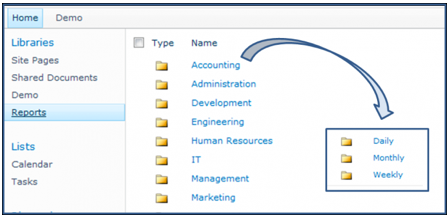
Figure 4: SharePoint Library Structure
Now that we know how the environment and folder structure are set up, let’s discuss how we plan our approach. In order for the task to know where to upload the report to the appropriate SharePoint folder, the task would need to look up the information from the SQL database table. Before knowing which record to look up from the SQL database table, the task would need to retrieve the prefix of the report from the shared folder first. Finally, after the task finished uploading one report, it needs to repeat the whole process again for the next report in the shared folder until it finishes uploading all the reports.
The Automate Task:
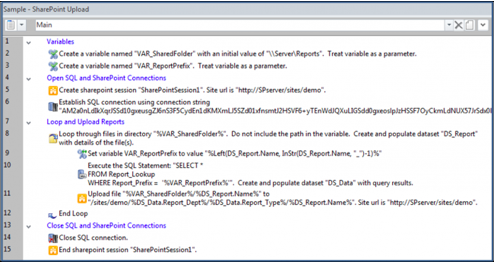
Figure 5: Automate Task--Steps 1-15
Figure 5, above, shows the complete SharePoint task from Steps 1-15. One of the most important concerns when developing a new Automate solution is usability. For that reason, this example task uses variables and datasets. We want an Automate task that we can use over and over again for different reports with different names and with hassle-free maintenance. Let’s use the variable VAR_SharedFolder as an example (Step 2).
Variables in Automate Task
VAR_SharedFolder is a variable that holds the path of the shared folder, in this case, “\\Server\Reports”. We can always use \\Server\Reports instead of the variable VAR_SharedFolder in the task, but if we were to change our folder location or duplicate this task for another project with a different folder location, we would need to go to Steps 8 and 11 to change the folder path individually. If we employ the idea of using a variable, we would only need to change the folder path at Step 2. This is a good practice to employ to any Automate task, especially if you plan on reusing the task or using it as a template.
The next region we have from the task is “Open SQL and SharePoint Connections,” which contains two simple steps to make connection with SharePoint and SQL database: Create a SharePoint connection and Establish a SQL connection.
Loop Concept
The next region is where we employ the loop concept. Since we have to repeat the process for each report in the shared folder, it means the task would need to loop through specified steps to repeat the process. When first starting any Automate task, it’s always easy to overcomplicate if the loop is added to the task first. With situation like this, one technique that I employ often is to build a task to handle one single report first and then go back to look at which steps are needed to repeat the process before adding a loop. Using this technique, we know that the only steps that need to be repeated are Steps 9, 10, and 11 to parse the file prefix, lookup the information from the SQL database, and upload the report to SharePoint. We do not need to log on or log off SharePoint multiple times, nor do we need to keep making a connection with our SQL database. Therefore, when we add the loop, Steps 9, 10, and 11 would be the only steps inside the loop.
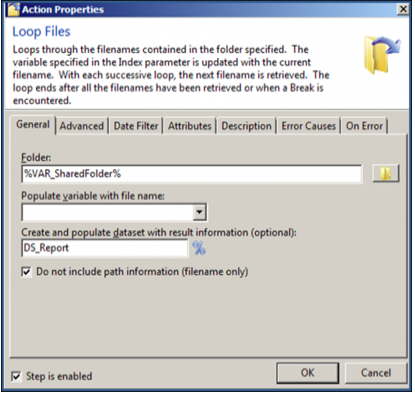
Figure 6: Loop Files Action
Notice that we used the Loop Files action in our task. The Loop Files action allows us to repeat or loop through the steps until there are no more files in a specified folder; in this case, it’s the VAR_SharedFolder or \\Server\Reports. The action also allows us to create and populate a dataset (DS_Report in Figure 6) with the file information, such as the filename and file size. Another action that allows us to populate a dataset with information is the SQL Query action, or Step 10, in the task. The SQL Query step in the task queries the SQL database table and populates the report lookup information to another dataset, DS_Data.
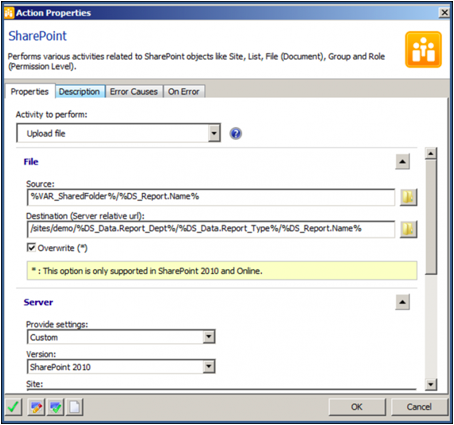
Figure 7: SharePoint Upload File Action
With these two sets of datasets holding all the information, we can now reference them when we upload the report using the SharePoint action (Figure 7). Let’s take a look at the value used in the Destination field: /sites/demo/%DS_Data.Report_Dept%/%DS_Data.Report_Type%/%DS_Report.Name%.
It might look a little confusing at first, so let’s dissect this together.
In this example:
- /sites/demo/ is constant, so it would always be read as /sites/demo
- %DS_Data.Report_Dept% references the Report_Dept column from the database table
- %DS_Data.Report_Type% references the Report_Type column from the database table
- %DS_Report.Name% references the filename from the shared folder
To simplify this, let’s use the report “R0001_Report_1124577780.xlsx” as an example. R0001 is the prefix of the report and according to the database table, Report_Dept would be “Accounting” and Report_Type would be “Daily”.
Therefore:
/sites/demo/%DS_Data.Report_Dept%/%DS_Data.Report_Type%/%DS_Report.Name%
would be like this during execution:
/sites/demo/Accounting/Daily/ R0001_Report_1124577780.xlsx.
Get Started
Ready to see how business process automation can benefit your organization?