
No matter what your job description is, almost everyone uses—and trusts—Excel in some form or another. It's a valuable tool for monitoring data, making calculations, or delivering data in a report.
Sequel Viewpoint users have been exporting data from their views (otherwise known as queries) to Excel for years.
Today, you can take it a step further. You can access your view directly in Excel and manipulate the results in a familiar, easy-to-use spreadsheet.
The Excel Add-In (Excel 2010 and higher) does just that!
It gives you the ability to run your views from Viewpoint directly in Excel. Excel can even serve a starting point for your users to access their data. And it's a great fit for both beginning and expert Sequel users.
Sign Up for Training to Learn More >
The Excel Add-In toolbar has many functions to help you access and manipulate your Viewpoint data. Here are some tips and tricks for using it to your advantage.
Tips for Accessing Your Data
To begin taking advantage of the benefits of working under the power of Sequel in Excel, you'll need to link your data.
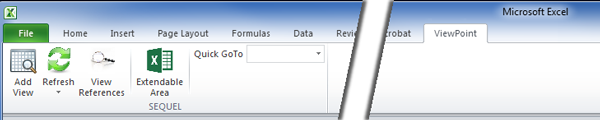
Tip #1: Add Your View
Click “Add View” and find your Sequel view.
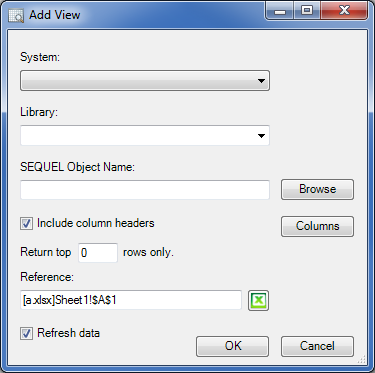
To get started, you should fill in:
- System, Library, and Sequel Object Name to run the desired view
- Include column headings to make the column names viewable
- Return top n rows to limit how many data items are shown
- Reference to determine which tab of the spreadsheet the view will run on
- Refresh data to automatically receive live data each time the Excel file is opened
- Columns to select specific columns to be included
Tip #2: Refresh It Whenever You Want to See Live Data
If you want to refresh a view with live data, click “Refresh.”
Tip #3: Manage Your Excel File
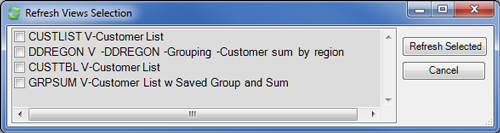
“View References” displays the list of views that you have added and allows you to make modifications.
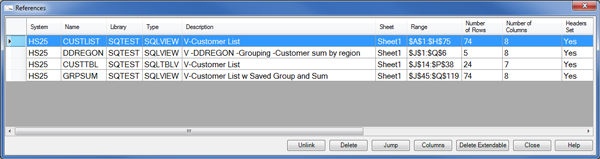
If you click Unlink, it ends the relationship between the Excel file and Sequel Viewpoint. That means the Excel file can no longer be refreshed with live data.
Click Delete to remove a view from the spreadsheet.
If you click Jump (or double click), you’ll leave the “View References” screen and go to the Extendable Area of the currently highlighted view.
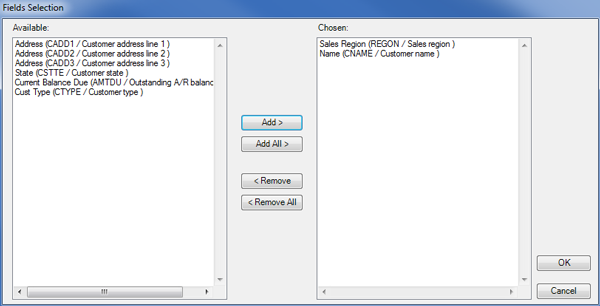
The Columns button opens the Field Selector window to add or remove view columns from the workbook.
Delete Extendable will delete an Extendable Area associated with the selected view.
Tip #4: Go Where You Need to Go
Utilize “Quick GoTo” to jump from view to view.
Tips for Manipulating Your Data
Tip #1: Use the Extendable Area
Use the Extendable Area to add an additional column (i.e. for performing calculations).
Let’s say that you’re looking at an existing view in your spreadsheet.
Your view shows you the Current Balance Due for the customers shown. But you also want to know the percentage of the Total Amount Due that each customer owes. By utilizing an Extendable Area, you can perform this calculation—and ensure that it updates each time your data refreshes!
First, sum up the Total Amount Due in the Current Balance Due column. Then, enter a formula in the next column that determines the percentage total for each row of data.
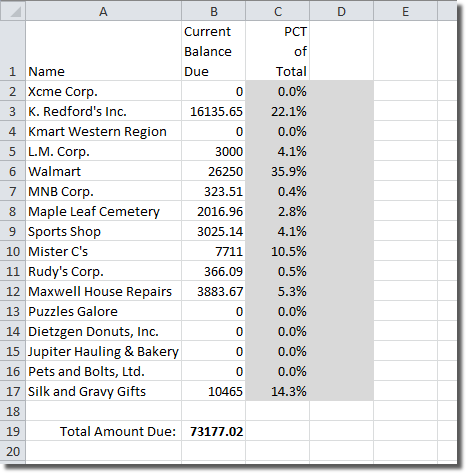
Next, define the new percentage column as an Extendable Area:
- Click “Extendable Area” in the toolbar.
- When the “Range Selection” window appears, click and drag the tool to highlight the desired area (the gray column above) and press OK.
- A window with a list of views currently in your workbook appears. Select the view that you want to associate with the Extendable Area (the one on which you’ve just placed your Extendable Area).
- Now that you’ve finished setting up your Extendable Area, you can also highlight it to make it more distinguishable.
Don’t forget that you can also take advantage of Excel’s other functions, too, like graphs. Since your view is linked with your spreadsheet, whenever the data refreshes, the graph will also refresh!
Get Started with the Excel Add-In
You’ve now learned how easy it is to access and manipulate your data with the Excel Add-In. Whether you’re a Sequel beginner or expert, this new feature expands your options and gives you greater flexibility for working with your data.
Get More Out of Sequel
Interested in doing more with Sequel Data Access? Explore upcoming training sessions and build your skills today.